Every bedroom has them, those awkward corners, alcoves, or stretches of wall that don’t quite fit a dresser or nightstand. Instead of letting that space collect dust or become a graveyard for laundry baskets, consider turning it into a functional nook. A well-designed bedroom nook can serve as a reading retreat, a compact workspace, or a vanity station without requiring a full-scale renovation. Most nook projects need minimal tools, modest budgets, and a weekend’s worth of work. Whether you’re dealing with a shallow closet, a bay window, or just an underutilized corner, these ideas will help you reclaim square footage and add genuine value to your bedroom.
Table of Contents
ToggleKey Takeaways
- Bedroom nook ideas transform underutilized corners and alcoves into functional zones for reading, working, or grooming without requiring major renovations or structural changes.
- A well-designed nook requires minimal tools and budget—most projects cost $40–$150 and can be completed in a single weekend.
- Proper lighting is essential for any nook; task lighting prevents shadows in reading areas, reduces eye strain at work desks, and improves accuracy at vanity stations.
- For safety and compliance, secure all nook furniture to wall studs using appropriate fasteners, hire licensed electricians for new outlets or circuits, and always use a level during installation.
- Window seat nooks and floating desk setups are beginner-friendly DIY projects that maximize natural light and add resale value without eating into bedroom floor space.
What Is a Bedroom Nook and Why Should You Create One?
A bedroom nook is any small, purposefully designed zone within the bedroom that serves a specific function, reading, working, grooming, or relaxing. Unlike a full room addition, a nook repurposes existing square footage, often in corners, alcoves, or underutilized wall sections.
Why they’re worth the effort: Bedrooms aren’t just for sleeping anymore. Remote work, hybrid schedules, and smaller living spaces have pushed homeowners to maximize every inch. A nook lets you zone your bedroom without adding walls or eating into floor space. It also increases perceived value if you’re planning to sell: buyers appreciate built-in functionality.
Structural considerations: Most nook projects are cosmetic, adding shelving, seating, or lighting, and don’t require permits. If you’re planning to modify wall framing, add electrical outlets, or install hardwired lighting, check local building codes. Any electrical work should meet NEC standards, and it’s often worth hiring a licensed electrician for outlet relocation or new circuits.
Space requirements: You don’t need a mansion. A nook can fit into as little as 2 feet by 3 feet for a compact desk setup, or 4 feet by 4 feet for a cushioned reading corner. Measure your available space, account for door swings and traffic flow, and plan accordingly.
Reading Nook Ideas for Ultimate Relaxation
A reading nook is the classic bedroom addition, low-effort, high reward, and endlessly customizable.
Core components:
- Seating: A small armchair, floor cushions, or a built-in bench with a foam cushion (4-inch high-density foam works well).
- Lighting: Adjustable task lighting is essential. A swing-arm wall sconce or a small floor lamp with a 3-way bulb (40/60/100W) gives flexibility. Avoid overhead-only lighting, it creates shadows on the page.
- Storage: Floating shelves or a narrow bookcase (8–12 inches deep) keeps books within reach without crowding the space.
- Textiles: A throw blanket, a couple of 18-inch throw pillows, and a small rug (3×5 feet or smaller) soften hard surfaces.
Layout tips: Tuck the nook into a corner to define the space without blocking pathways. If you’re working with an alcove, consider adding a tension rod with a curtain to create a cocoon effect. For small space living ideas, use vertical storage and keep furniture low-profile.
DIY option: Build a simple corner bench using 2×4 framing and a plywood top. Frame a box to the desired height (16–18 inches is standard for seating), secure it to wall studs with 3-inch deck screws, then add a cushion cut to size. Paint or stain the base to match your trim. Total cost: $50–$100 in materials, plus cushion and fabric.
Work-from-Home Nook Solutions for Small Bedrooms
If you’re short on square footage, a bedroom desk nook beats working from the kitchen table or bed.
Desk options:
- Floating desk: Mount a solid wood or plywood slab (24–30 inches deep, 36–48 inches wide) to wall studs using heavy-duty brackets rated for at least 100 lbs. Use a level and locate studs with a stud finder, drywall anchors alone won’t support a loaded desk.
- Corner desk: L-shaped desks maximize corner space. You can buy prefab units or build one using two countertop sections joined with brackets.
- Fold-down desk: Wall-mounted fold-down desks save floor space when not in use. Make sure hinges and support arms are rated for the load.
Ergonomics matter: Standard desk height is 28–30 inches. Your elbows should rest at 90 degrees when typing. If you’re using a dining chair, add a cushion or footrest to adjust height.
Electrical and cable management: If there’s no outlet nearby, hire an electrician to add one. DIY extension cords stretched across the room are a fire hazard and violate most residential electrical codes. Use cable raceways or cord clips to keep cables tidy and off the floor.
Lighting: Task lighting is non-negotiable. A desk lamp with a CRI (Color Rendering Index) of 90+ reduces eye strain. Position it opposite your dominant hand to avoid shadows.
Storage: Wall-mounted shelves, pegboards, or a small filing cabinet keep the desktop clear. If you’re drilling into drywall, use wall anchors rated for the shelf’s loaded weight.
Cozy Window Seat Nooks That Maximize Natural Light
A window seat nook transforms an underutilized window into a multipurpose zone for reading, lounging, or storage.
Structural prep: Measure the window opening, including trim. Most window seats fit snugly between walls (if you have an alcove) or extend 12–18 inches past the window casing. Check for radiators, HVAC vents, or electrical outlets below the window, relocating these requires professional help.
Building the base:
- Frame a box using 2x4s (actual dimensions: 1.5 x 3.5 inches). Build the frame to your desired height, 16–18 inches is comfortable for seating.
- Secure the frame to wall studs with 3-inch screws. Use a level to ensure the top is flat.
- Top with 3/4-inch plywood cut to size. Sand edges smooth.
- Add a hinged lid if you want hidden storage underneath. Use piano hinges for even weight distribution.
Cushions and upholstery: Cut a foam cushion (4–6 inches thick, medium-firm density) to match the seat dimensions. Wrap in batting and fabric, then staple underneath or use a zippered cover for easy removal and washing.
Safety note: Always wear safety goggles when cutting lumber. Use a miter saw for clean, square cuts, or a circular saw with a straight-edge guide if a miter saw isn’t available.
Finishing touches: Paint or stain the base to match existing trim. Add throw pillows and a small side table for drinks or books. For interior design tips, layer textures, linen, velvet, or cotton blends, to create visual interest without clutter.
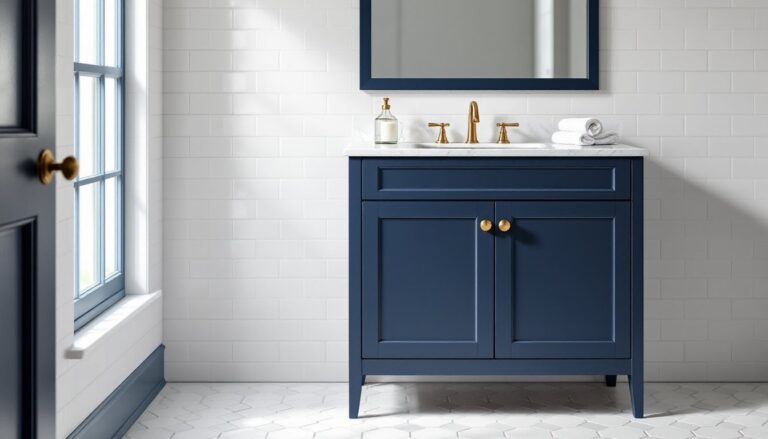
Vanity and Dressing Nooks for Morning Routines
A dedicated vanity nook streamlines morning routines and keeps makeup, jewelry, and accessories organized.
Vanity setup:
- Surface: A small desk (30–36 inches wide), a floating shelf with a wall-mounted mirror, or a repurposed console table works. Depth should be at least 16 inches to accommodate products and tools.
- Seating: A low stool or small upholstered chair. Look for something 17–19 inches high to pair with standard desk height.
- Mirror: A wall-mounted mirror at eye level or a tabletop tri-fold mirror with built-in lighting. LED vanity lights (3000–4000K color temperature) mimic natural daylight and improve makeup application accuracy.
- Storage: Drawer organizers, acrylic trays, or small bins keep products sorted. Wall-mounted magnetic strips hold metal tools like tweezers and scissors.
Lighting is critical: Overhead lighting creates shadows. Flank the mirror with sconces or use a lighted mirror with adjustable brightness. If hardwiring isn’t an option, plug-in LED strip lights work, just hide cords along the mirror frame or desk edge.
Electrical work: Adding outlets near a vanity often requires running new wire through walls. Unless you’re comfortable working with your home’s electrical panel and local codes, hire a licensed electrician. Most jurisdictions require GFCI outlets in areas where water and electricity mix, though bedrooms typically don’t mandate this unless the vanity is in an en-suite bath.
Pro tip: Paint the nook wall a different color or add peel-and-stick wallpaper to visually separate the space. It’s a low-commitment way to zone the room without construction.
DIY Bedroom Nook Projects You Can Complete This Weekend
Most nook projects don’t require advanced carpentry skills. Here are three beginner-friendly builds.
Project 1: Floating Corner Shelf Nook
- Materials: Two floating shelves (24–36 inches each), L-brackets, screws, stud finder, level.
- Steps:
- Locate wall studs in the corner.
- Mark shelf height (30 inches for a desk, 16 inches for seating).
- Attach L-brackets to studs, then mount shelves.
- Add a floor cushion or small chair below.
- Time: 1–2 hours.
- Cost: $40–$80.
Project 2: Curtain-Defined Reading Nook
- Materials: Tension rod or ceiling-mounted curtain track, curtain panels, floor cushions, small bookshelf.
- Steps:
- Install the rod or track to section off a corner.
- Hang curtains to create a semi-private zone.
- Add cushions, a small rug, and a lamp.
- Time: 1 hour.
- Cost: $50–$100.
- Note: This works especially well for renters, no wall damage.
Project 3: Built-In Desk Nook
- Materials: Butcher block or plywood countertop (24 x 48 inches), two shelf brackets (rated for 100+ lbs), screws, stud finder, level, sandpaper, finish.
- Steps:
- Locate studs where you want the desk.
- Mount brackets at 28–30 inches height, level across.
- Place the countertop on brackets and secure from underneath with screws.
- Sand and finish the surface (polyurethane or Danish oil).
- Add a chair and task lighting.
- Time: 2–3 hours (plus drying time for finish).
- Cost: $80–$150.
- Tool note: A circular saw or hand saw works for cutting the countertop to size, but a miter saw gives cleaner edges if you’re making angled cuts.
Safety reminders: Wear safety goggles when cutting, dust masks when sanding, and gloves when applying finishes. Work in a ventilated area if using oil-based products.
For more budget home renovation stories and step-by-step project inspiration, look for blogs and forums where DIYers share real-world results, materials lists, and lessons learned.
Conclusion
Bedroom nooks turn wasted corners into functional, personalized spaces without the cost or complexity of major renovations. Whether you’re building a window seat, mounting a floating desk, or carving out a reading corner with curtains and cushions, most projects fit into a weekend timeline and a modest budget. Measure carefully, secure everything to studs, and don’t skip the prep work, sanding, priming, and leveling make the difference between a project that looks DIY and one that looks built-in. With the right approach, even a small bedroom can deliver big functionality.